Version 0.0.6-alpha.2 for Windows. Twelve short guides, one per area of the app. Every button name, menu path, keyboard shortcut and on-screen message below was taken from the installed build, and every screenshot is of that build running a small demo project.
New to Catalase? Read Getting started, then dip into whichever section you need.
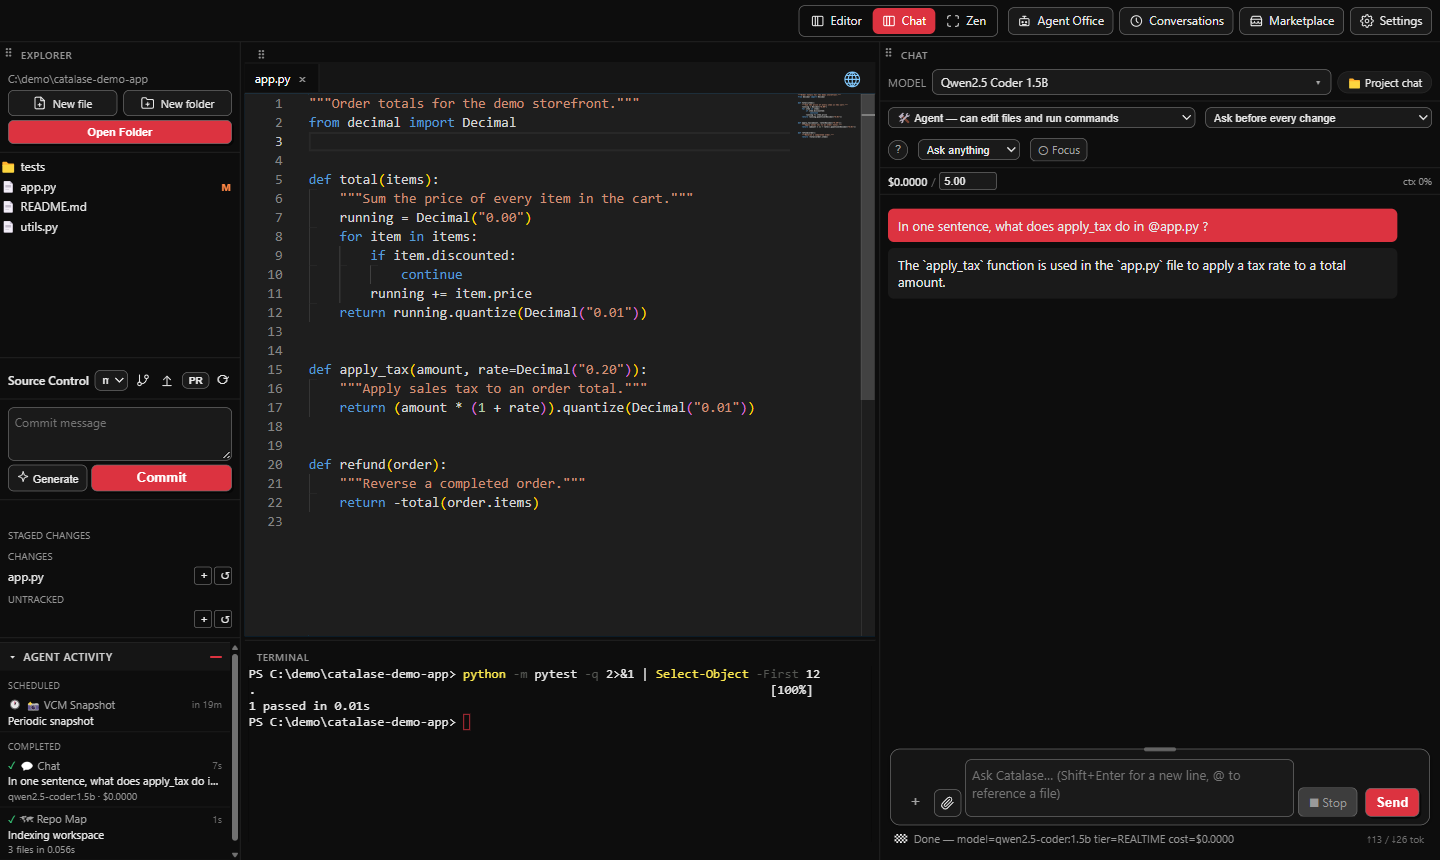
What's in this guide
| 1. Getting started | Install, first launch, finding your way around |
| 2. Explorer | Open a project and manage its files |
| 3. Editor | Edit code, shortcuts, AI suggestions, themes |
| 4. Terminal | Run commands without leaving the window |
| 5. Source Control | Review changes, commit, branch, open a PR |
| 6. Chat | Ask questions about your code |
| 7. Agent mode | Let the AI make changes, with your approval |
| 8. Commands and memory | Slash commands, your own commands, MCP tools |
| 9. Conversations | Find, resume and branch past conversations |
| 10. Project snapshots | Pick up where you left off |
| 11. Models and providers | Local models, API keys, subscriptions |
| 12. Privacy, cost and activity | Keep code local, control spend, see what runs |
1. Getting started
Install Catalase, finish the welcome steps, and open your first project.
Install
- Run
Catalase-Setup-0.0.6-alpha.2.exeand choose an install folder. - If Windows shows "Windows protected your PC", choose More info → Run anyway.
- Upgrading? Run the new installer over your existing copy. Your API keys, preferences and conversations are kept, and your panels keep their current order.
Get the installer from the download page.
The installer isn't code-signed yet, so Windows SmartScreen warns on first run. Choose More info → Run anyway to continue.
First launch
- Catalase starts its AI backend in the background. The status line under the chat box reads 🔌 Plugging in… for up to about 30 seconds the first time after a restart, then ✅ Connected.
- The Welcome to Catalase screen checks two things:
- 1 · Local model (required for inline suggestions). If Ollama isn't found, install it and click Re-check, or click Browse models.
- 2 · Plan (optional). Connect a subscription you already have, or add an API key in Settings.
- Click Done, or Skip to set things up later.
- Open a project with File → Open Folder…. Catalase reopens that folder next time.

Finding your way around
- Left: Explorer and Source Control. Centre: the editor, with the terminal below it. Right: Chat.
- Rearrange panels by dragging the ⠿ grip in any panel's header. Your order is remembered, including if you quit straight afterwards.
- Toolbar (top right): Move chat · Watch your agent · Conversations · Marketplace · Settings (Ctrl+Shift+,). At narrow widths the toolbar wraps so every button stays reachable.
2. Explorer
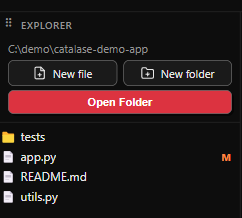
Open a project folder and manage its files. Left panel.
Open a project
- Click Open Folder, or use File → Open Folder….
- From a terminal or shortcut:
Catalase.exe "C:\path\to\project". A folder given this way wins over the remembered one. - File → New Project… starts one from scratch: pick a location, type a name, and Catalase creates that folder and opens it. If the name is already taken it says so rather than writing into the existing folder.
- File → Close Folder puts you back to the no-folder state without quitting.
- If the remembered folder has been moved or deleted, Catalase starts with no folder open.
Manage files
| Right-click on | You get |
|---|---|
| A file | Rename…, Delete |
| A folder | New File…, New Folder…, Rename…, Delete (with contents) |
| Empty space | New File…, New Folder… at the project root |
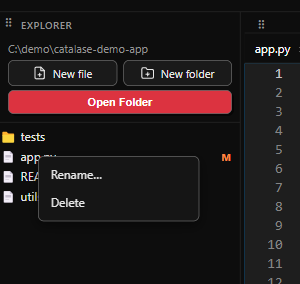
Catalase won't overwrite: creating or renaming onto an existing name is refused with a message. Files show their git state (modified, staged, untracked) next to the name.
Catalase keeps its own project data (snapshots, memory, custom commands, MCP settings) in a hidden .catalase folder. It doesn't appear in the Explorer; your own dot-folders do.
3. Editor
Edit code in tabs, with AI suggestions as you type and Python code intelligence.
Everyday shortcuts
| Keys | Action |
|---|---|
| Ctrl+N / Ctrl+O | New file / open file |
| Ctrl+S / Ctrl+Shift+S | Save / Save As |
| Ctrl+W | Close tab |
| Ctrl+Tab / Ctrl+Shift+Tab | Next / previous tab |
| Ctrl+F / Ctrl+H | Find / replace |
| Ctrl+G | Go to line |
| Alt+↑ / Alt+↓ | Move line up / down |
| Shift+Alt+↓ | Copy line down |
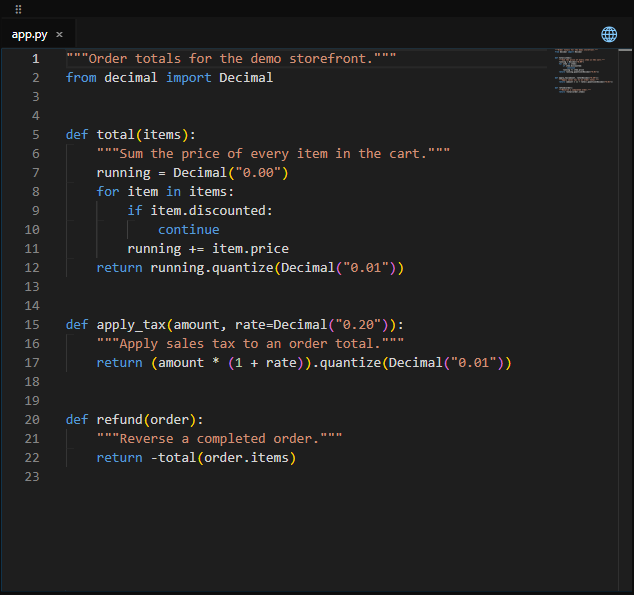
The full list is in Settings → Keybindings.
AI suggestions as you type
- Make sure a local model is installed (see Models and providers).
- Turn on Settings → Editor → Inline suggestions.
- Type. Grey ghost text appears: Tab accepts, Esc dismisses, Alt+] shows the next suggestion.
Speed can vary with your hardware: roughly 50–200 ms with a dedicated GPU, 0.5–3 s on CPU only, where a smaller model is recommended.
Appearance
Settings → Editor offers Dark, Light and High Contrast, plus font size and tab size. Changes persist across restarts.
Code intelligence (diagnostics, go-to-definition) is available for Python. Other languages get syntax highlighting and AI suggestions, but no language-server features.
4. Terminal
A PowerShell terminal inside the window, opened in your project folder.
- Show or hide it with Ctrl+` or View → Toggle Terminal.
- Run → Focus Terminal moves the cursor into it.
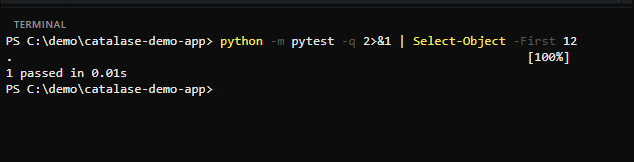
- In chat, type
@terminalto give the AI the terminal's recent output, for example to explain an error.
"Waiting for input"
If a command stops to ask something (a password, Continue? (y/n)), a banner reads ⚠ Waiting for input: "…", so you (or the agent) know it's waiting. Answer in the terminal and the banner clears.
This banner used to appear after a command had already finished, if its output happened to look like a question. It now recognises that the shell has returned to its prompt.
5. Source Control
Review changes, commit with an AI-written message, publish your work. Left panel, below the Explorer.
Commit your changes
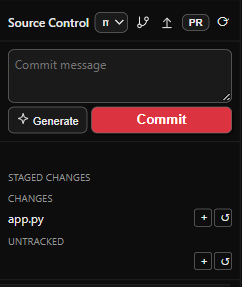
- Changed files are grouped into Staged Changes, Changes and Untracked. Click ⟳ to refresh.
- Stage what you want. Click a file to see its diff, and 💬 Explain for a plain-language summary.
- Type a message, or click Generate to have AI write one from your staged changes.
- Click Commit. If nothing is staged, Catalase offers to stage everything and commit.
Branches and publishing
| Control | What it does |
|---|---|
| Branch dropdown | Switch branch |
| New session branch | Creates and switches to a branch for your AI session (catalase/session-…); switches to it if it already exists |
| Push | Pushes the current branch to origin, setting upstream the first time |
| Create PR | AI drafts a title and description, then Catalase opens a GitHub pull request |
Before you use Create PR: you need the GitHub CLI installed and signed in (gh auth login), plus a GitHub remote. Catalase checks all three before pushing, so a PR that can't be created leaves nothing published.
Create PR works with GitHub only, through the gh CLI.
6. Chat
Ask questions about your code. Chat panel, centre by default.
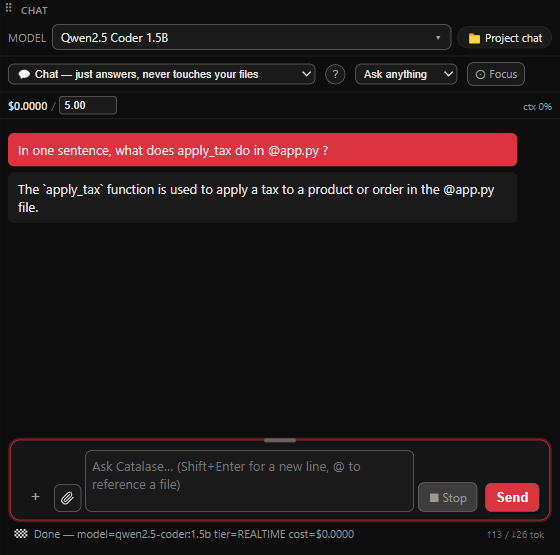
Ask a question
- Choose a model in the picker: local, API-key, or a connected subscription.
- Optionally choose a kind of help: Ask anything, Explain, Refactor, Debug, Generate tests or Document.
- Type and press Enter. Shift+Enter makes a new line.
Add context
- Mention files: type @ and pick a file, or
@terminalfor recent output. - The + menu: attach a file, mention a project file, clear the conversation, rewind, switch model, set effort, toggle thinking.
- Images: attach screenshots for vision-capable models. Images are sent in regular chat, not in Agent mode.
While it's answering
- Press the stop button to interrupt.
- Send another message and it waits its turn: a banner shows it queued, with Cancel if you change your mind. It sends automatically when the current turn ends.
- Set Effort (low, medium, high) for models that support it.
- If a message fails, Catalase can retry with the next available model.
Reading the status line
| It says | Meaning |
|---|---|
| ✅ Connected | Ready |
| 🔌 Plugging in… | Backend still starting |
| 👨🍳 Chef is cooking… | The agent is working |
| 🙋 Need your OK | Waiting for your approval on a tool call |
| 🔌⚡ Connection dropped — retrying… | Lost the connection, retrying |
| 🪫 Backend's gone quiet — try restarting Catalase | The backend has stopped |
7. Agent mode
Let the AI read files, make edits and run commands in your project, with your approval.
Start an agent task
- Open a project folder. Agent mode needs one.
- Pick Agent from the mode dropdown at the top of the chat panel. The same dropdown holds Chat (answers only, never touches your files) and Plan (writes a plan first and asks before doing anything).
- Choose how much it should ask you, describe the task, and send.
| Choice | What happens | Use it when |
|---|---|---|
| Chat | Answers questions, never touches your files | Asking about code |
| Agent, asking before every change | Every action is designed to wait for approval | New to the agent, or sensitive code |
| Agent, asking only for risky changes | Low-risk actions run; risky ones ask | Most day-to-day work |
| Agent, not asking | Every action runs immediately | Throwaway branches you'll review after |
| Plan | Writes a plan and does nothing until you approve | Larger changes |
Chat, Agent and Plan used to be an "Agent mode" tickbox plus a separate permission dropdown that also held Plan. They are one dropdown now.

Review what it does
- Each proposed action appears as a card with its risk level. Approve or reject it.
- After a file change runs, Undo on its card is designed to reverse that change.
- In Plan mode the plan opens in a read-only tab; click Execute plan when happy.
- Open Watch your agent (toolbar) to see what it's doing. The scene is draggable and resizable.
Tip: use New session branch in Source Control before a larger agent task, so its changes are easy to review or discard.
If the agent stops responding: the status shows 🪫 Backend's gone quiet — try restarting Catalase. It doesn't restart itself. Restart the app; your files and conversations are kept.
8. Commands and memory
Slash commands, your own project commands, project memory and MCP tools. Chat input.
Built-in commands
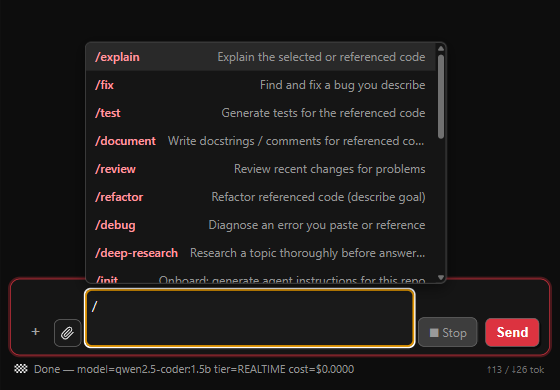
Type the whole command and press Enter. You don't have to pick it from the dropdown, and one Enter is enough. Type / on its own to browse the list, or run /help for the current one.
| Group | Commands |
|---|---|
| Coding | /explain, /fix, /debug, /test, /document, /refactor, /review, /deep-research |
| Conversation | /clear (or /reset, /new), /resume (or /continue), /fork, /rewind (or /checkpoint, /undo) |
| Session | /model (list, or /model sonnet to switch), /effort [low|medium|high], /usage, /help |
| Project | /init (asks the AI to write an AGENTS.md), /remember <fact>, /btw <question>, /mcp, /config (or /settings) |
Fixed in 0.0.6-alpha.2. Typing a command and pressing Enter used to send it to the model as ordinary text instead of running it. /clear was the worst case: it looked like nothing happened while the underlying session was quietly cleared behind the scenes. Every command above now runs when you type it and press Enter.
/config, /settings, /resume and /continue toggle their panel rather than only opening it. Run one twice in a row and the second run closes the panel again.
/diff is not available in v0.0.6-alpha.2. It is listed in the command palette but does not open a diff. Open a diff by clicking the file in the Source Control panel instead. See known limits.
Your own commands
- Create
.catalase/commands/in your project. - Add a Markdown file, e.g.
changelog.md, containing the prompt. Use$ARGUMENTSwhere text typed after the command should go. - Type
/changelog since last release. Custom commands also appear in the / list.
MCP tools
Add your servers to .catalase/mcp_servers.json in the project; their tools become available to the agent. Run /mcp to check they connected.
Current limits: no screen for managing MCP tools yet. If one server offers two tools with the same name, one becomes uncallable.
9. Conversations
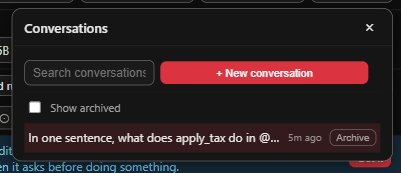
Find, resume and branch past conversations. Toolbar → Conversations.
- + New conversation starts fresh.
- Search by title; click a conversation to resume it.
- Rename or archive to tidy the list; tick Show archived to see archived ones.
Go back or branch off
Hover an earlier message of yours:
| Action | Effect |
|---|---|
| Rewind | Reverts your files and the conversation to that point. Asks first. |
| Fork | Starts a new branch from that point, leaving your files as they are. |
Limits: Rewind and Fork work on regular chat messages, not Agent-mode turns (use each action's Undo there). Conversations can be archived but not permanently deleted.
10. Project snapshots
Pick up where you left off. Catalase saves a picture of your project's structure and gives it to the AI when you resume.
Experimental. Project snapshots are experimental.
How it works
- A snapshot (a dependency-graph image plus a text summary) is taken when you close the app, every 30 minutes (skipped when nothing changed), and when you run
/remember, which is designed to take one as well. - Snapshots live in your project's
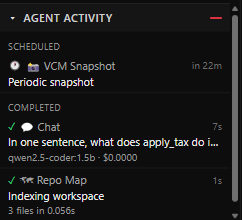
.catalase\contextfolder, one per day. - Progress shows as 📸 VCM Snapshot in the Agent Activity panel.
Resume a session
- Open the project. If a snapshot from today exists, a banner reads A project snapshot from today is available (experimental).
- Click Resume. With a vision-capable model the image goes with your first message; other models get the text summary.
- Click Dismiss to start without it.
The closing snapshot is now written reliably when you quit normally, including the very first one for a project. Earlier versions could lose it, so you no longer need to run /remember before ending a short first session.
A snapshot takes a few seconds to draw, so let the window close on its own rather than ending the process by hand.
11. Models and providers
Choose where AI comes from: local models, API keys, or subscriptions you already pay for.
Three ways to connect
| Route | How |
|---|---|
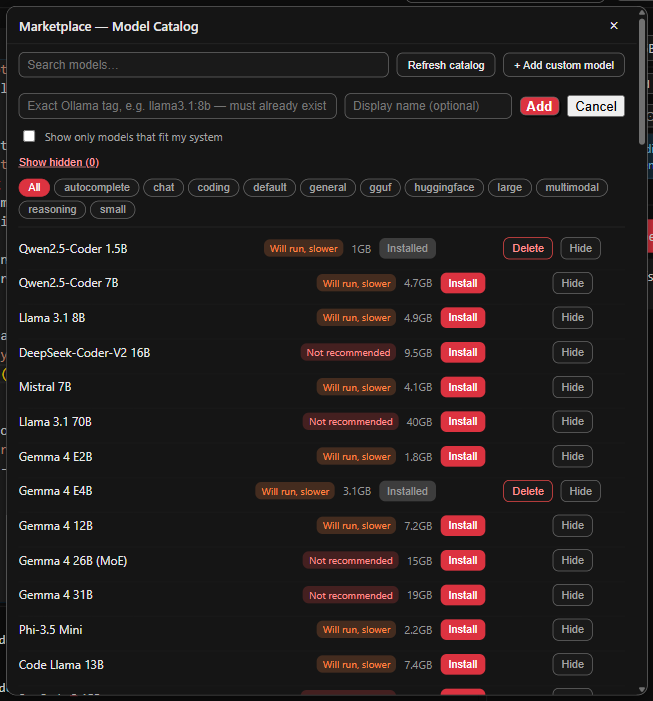
| Local (free, on your machine) | Install Ollama, then open Marketplace, tick Show only models that fit my system, and install one. Or pull by name in Settings → Local Models (Ollama). Use Refresh catalog to pull in newly discovered models; entries found automatically carry a source badge. Installed models have a Delete button that removes them from disk after a confirmation. |
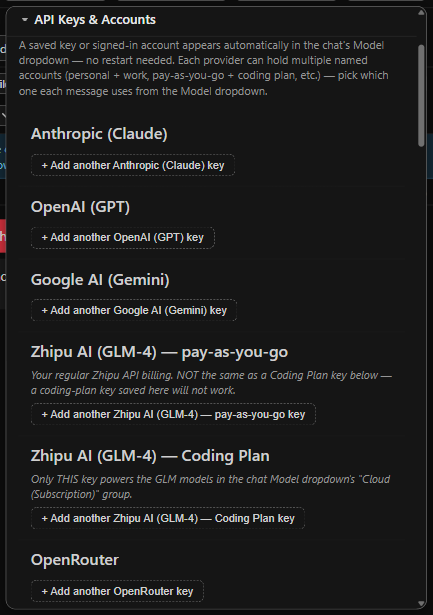
| API keys | Settings → API Keys: Anthropic, OpenAI, Google, OpenRouter, Zhipu (pay-as-you-go) and Zhipu Coding Plan. Use Test Key to check one; saved keys show masked. |
| Subscriptions | Settings → Coding Plans: Claude Code, OpenAI Codex, GitHub Copilot, Gemini CLI, Qwen Code, Amazon Q, opencode, GLM. Install the CLI and sign in to it. Catalase is designed never to see your credentials. |
The two Zhipu rows are separate on purpose: Z.ai bills them differently and a key for one won't work with the other. Each row explains which is which.
Model routing
Settings → Model routing lets you pick a model per task: Chat, Commit messages, PR title/body/changelog, Explain diff and Code review. Leave any on Use default. For example: a fast local model for commit messages, a stronger cloud model for code review.
The Model picker
Clicking the model name opens a picker split into two parts:
- The top section is what you can use right now: your local Ollama models, any subscription CLI you have installed, and any provider you have saved a key for.
- "Needs setup" is collapsed, and lists what you could use once you add a key or sign in. Its entries are greyed out with a lock and cannot be selected; the link inside it takes you straight to Settings.
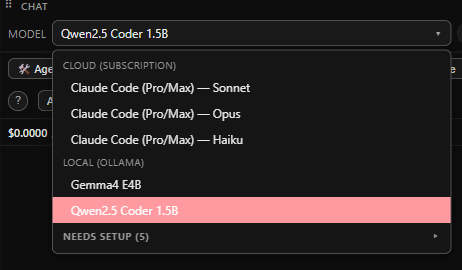
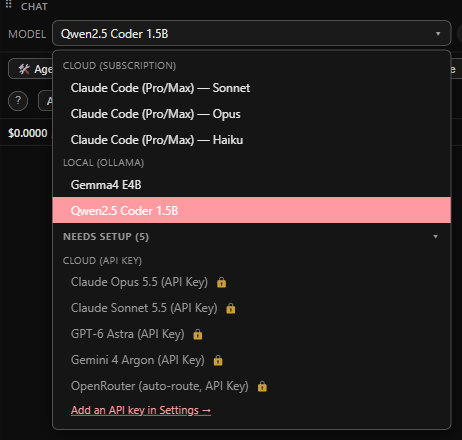
Worth knowing. The picker is short for the first half-minute after Catalase starts, then fills out as it finds what you have installed. The opencode plan appears as one entry. Typing /model <name> in chat is the quick way to switch.
Switching quickly
Use /model sonnet in chat. /model alone lists everything available; an ambiguous query lists the candidates instead of guessing.
Large local models with llama.cpp (advanced)
- Open Settings → Local inference backend. Catalase shows your RAM and GPU, recommends Ollama or llama.cpp, and suggests a quantization level.
- Install Python with
pip install llama-cpp-python. - Pick that Python from the suggested list or enter its path. You can either save it (Catalase launches it to check it works) or click Install llama-cpp-python, which runs a real
pip installagainst that interpreter and streams the progress.
If verification fails, the message now tells you which problem it is: a missing package ("llama_cpp not importable in this interpreter") versus something that is not a Python at all. For the first, click Install llama-cpp-python; the button works without a prior successful check.
Limit: even once llama.cpp is installed, chat still routes through Ollama. See known limits.
12. Privacy, cost and activity
Keep code on your machine, control spending, see what's running. For what leaves your machine and when, read the privacy page.
| Feature | Where | What it does |
|---|---|---|
| Local-only mode | Settings → Privacy | Catalase is designed to send nothing to cloud models. Pick a cloud model and Catalase substitutes a local one, telling you in the chat. |
| Cost meter and budget cap | Chat panel | Shows this session's spend against its cap (default $5.00), warns at 80%, alerts at the cap. Set the default in Settings → Budget. |
| Context usage | Chat panel | How much of the model's context window the conversation uses. Start a new one (/clear) when it fills. |
See what's running
- Agent Activity lists Running, Scheduled and Completed jobs: chat and agent turns, repo map indexing, snapshots, commit messages, diff explanations, model downloads and the language server.
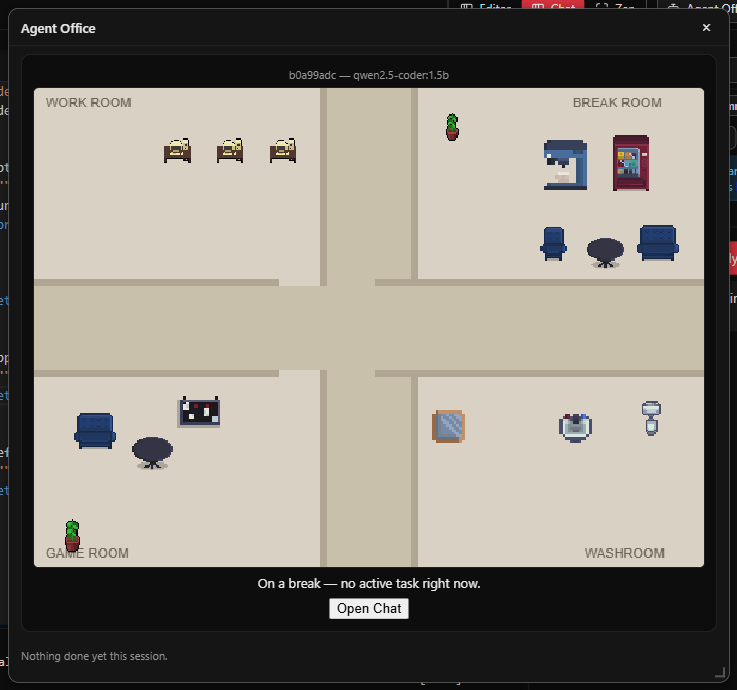
- Watch your agent (Agent Office) shows the agent at work and offers Review in chat when it's done.
Catalase 0.0.6-alpha.2 for Windows · guide prepared 2026-10-04. Every instruction, message and screenshot here comes from the installed build. Screenshots use a small demo project, so no real code appears in them.